Image breakdown – Double eXposure
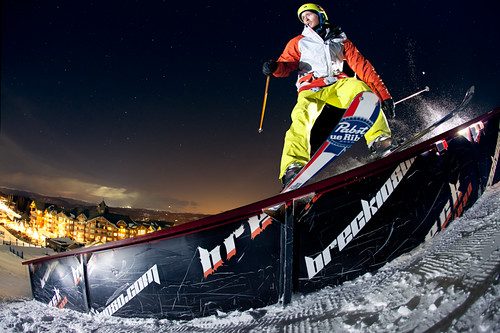
There is nothing new about shooting skiing at night, but what's different in this photo is the double exposure.
By that I mean that this photo was created from two different exposures. One for the athlete, and another one for the night sky, and the buildings. This technique works really well, because it creates a lot of depth in the shot. Instead of having a black backdrop behind the athlete, now you have a whole night scene.
To capture this image, I used a three flash setup, tripod, and Canon 5D mark II with a 15mm fisheye on it. I had two Quantum Trios, fired by a Quantum Pilot to my left and right, and also an alienbee to the right and behind Hunter (the skier), and fired with its light sensor on the back. The first light to the left was at a pretty high setting, as was the bee that worked as a rim light. The other flash (to the right of me) worked as a fill light. It was really cool that I was able to have full control over my flashes by using the Quantum Pilot. That allowed me to quickly change the power output and get the ratio I wanted with just a couple tries.
I used a tripod for every shot, and tried to stay as close to the rail as possible, so that Hunter fills more of the frame. After every action shot, I would turn off the flashes and set my shutter speed to a 15 seconds exposure while Hunter climbed back up out of frame. This was how I captured the buildings in the background along with the night sky.
From there I chose my favorite shot (I especially liked this one because the angle of the ski matches with the "bre" letters. I placed both photos as layers in Photoshop and used masks and a brush to blend them together. Since both photos are matching perfectly (because of using a tripod), it was really easy to blend them together.
Now there’s only one thing left to be done, you need to go out and try it for yourself!


on
I love it! I really need to try some of these myself.