

Most of the time, it’s pretty tough to motivate yourself (and the athlete) to go out and capture an image at 1 in the morning….. Planning the day before is key. Here’s how this shot was captured by APS’ Connor Walberg.
First off, “Image Breakdown” is a brand new section at APS that some of you may recognize from the APS’ predecessor under a different name. Bonus points if you can name the site it comes from in the comments… This new section will take a technically difficult and impressive image, and dissect it so that you can go capture something similar with your own twist. If you have an amazing image that you would like posted, please contact us at [email protected], we would love to feature your image and writeup assuming we are impressed!
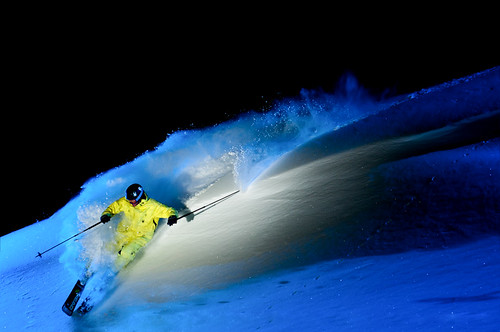
First off, let’s dive into the detail that all you tech nerds (like myself) are dying to hear. LIGHTING. This shot was lit by using 2 alienbees B1600 flashes. These are both very powerful lights and really give me great distance to work with from the athlete. This way I can be sure my gear won’t get plowed over by the athlete. Hot shoe flashes have great power at night too, so don’t overlook them as a great lightweight option. This cornice was right next to a road so it was really easy to get access and carry up my heavy gear.
The flashes were triggered with a Vagabond power pack, but Alienbees has a new option that makes them WAY lighter. Check out the review of the Vagabond Mini Lithium here. One flash was placed way off to the left, and pretty much in line with where the athlete is pointing his pole. This flash was set to 1/4 power and gelled with a dark blue gel. Next, I needed to light the athlete with some natural looking white light. The blue is cool on it’s own, but without a white fill light the athlete would mostly be a silhouette.
To keep the fill from overpowering the blue light, I placed a 20 degree spot grid on the flash to isolate it to just where the athlete would go through. This flash was set to about 1/16 power. Camera was set to my highest available sync speed at the time of capture (1/250th) Now I would use a PocketWizard Flex or Mini to get a real push out of it at 1/1600th or so. You can learn more about pushing sync speed in this article. (Additional settings: ISO 500, f/5 (to let more light in), captured at 50mm with Nikon 50mm f/1.8)
One of the toughest aspects to capturing a shot like this is timing. The athlete fly’s through, it’s nearly pitch black out, and you hope/pray that your focus is perfect. For this image, I shined a flashlight on the cornice to establish focus. For night shoots always bring a couple strong flashlights! Focus will be nearly impossible otherwise.
Though you are shooting at night and using great lighting, you’ll still want a great composition. Really think about this in advance, especially for shots like this, a centered athlete can wreck the image. Getting caught up in the lighting, people often overlook the composition as one of the most important details of the image.
Before the athlete drops in, it’s key to communicate with them and make sure they have the EXACT spot where they need to turn, jump, roll, etc… To nail it, I aimed the flashlight right at the spot he would need to turn, and told him to turn right through the light. Fortunately it worked! If not, you’ll be looking for a new location since the powder will be wrecked.
For more information on capturing night skiing, be sure to checkout this article. 10 Tips for Shooting Night Skiing


