

As an Action Sports Photographer, making a great action sequence is vital, and not just so you can show it to your friends.
Sometimes when shooting a gnarly skate trick, or a huge snowboard jump. You can’t really show everything that is going on. A single frame just doesn’t give the viewer an idea for how huge the feature is, or ow many things the skater is incorporating in a single trick. That’s when it’s time to shoot a action sequence.
Before we go into details on how to put the action sequence together in Photoshop, it’s important to know how to shoot it properly.
There are two popular kinds of action sequences. The first one is where all the frames are blended in to one composite. The second one is where you have a bunch of smaller photos next to each other in a single frame.
You have to decide what kind of action sequence you want to create before determining angle and lens choice.
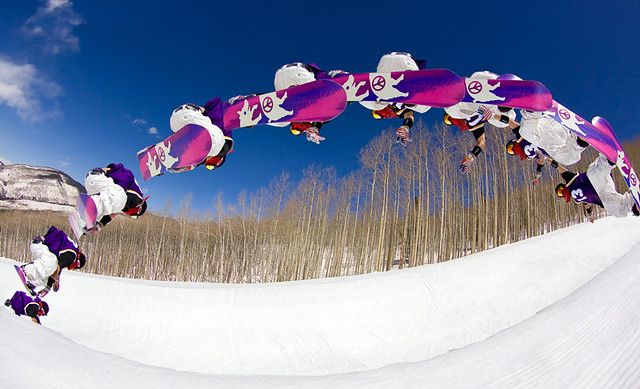
Action Sequences where every frame is in the same shot, will almost never work heads on. The athlete is dropping off something huge, or going up onto something huge. This is because the frames will pile up and block each-other. In this case you have to place the images next to each other. Otherwise you won’t be able to figure out what’s going on. If you are shooting with a fisheye or a wide angle lens and the athlete is flying across the frame then you can blend all the images into one composite. This will also work with a telephoto. Just make sure you are far enough away and not cropped in on just the athlete.
Now that you have figured out which kind you are going for, here are few things you have to keep in mind:
Shoot in Manual Mode.
Before you start shooting a action sequence make sure your camera is set to Manual mode. The first step to a great sequence is getting consistent images. If you camera is in Shutter or Aperture priority modes as the athlete enters the frame your exposure settings could change. Your are going to get images with slightly different exposures. This will make it harder for you when you have to put your sequence together later.
Lines and Shapes.
Think about the path of the athlete and the line or shape he is going to create with his movement. Use it as part of your composition! For example vertical lines create much more sense of action, than a horizontal line. Place yourself at 45 degree angle from your subject or shoot from the side, so all the frames create a diagonal line across the frame.
You don’t have to use ‘em all.
With all the new high speed cameras on the market, people often shoot at 8-10 fps. They build a sequence with all the frames they capture, even if they overlap. If the action is not lightning fast they have a bunch of frames that overlap a big part of the previous image. The final result looks like a big mess. The fact that you got 50 frames from a jump doesn’t mean you have to use 50 in the final sequence. Choose the best one and maybe skip every other frame or just skip the ones you have to. This way in the final image all the frames are evenly spaced and you can clearly see the action.
Start shooting early and shoot after.
To get a great and complete sequence, you shouldn’t save on frames. You don’t want a sequence that is missing the first couple frames. It will look incomplete. Start shooting early and hold the shutter down until the action is over assuming you have enough shots.
Your camera buffer is your limit.
Most of the high end cameras have a buffer indicator inside the viewfinder. It is easy to see when you are going to run out of buffer. Even though it’s important to start shooting early and to hold the button longer, you can’t over do it. You won’t have enough memory (and processing speed) to capture the whole thing. Check your camera manual and calculate how long you can shoot for at the highest frame rate. If your camera has a small buffer or the feature you are shooting is huge and you have to shoot for 4-5 seconds then you may have to switch to .JPEG. We wouldn’t recommend this mode normally but in this case it could be the only way. Another thing to do would be lowering the framer rate if your camera allows it. For example instead of 10fps with the Canon 1D you can set it to 7,8 or 9 fps so you can shoot longer.
Tripods are not a must, but will make your life easier.
A tripod is not a necessity for a good action sequence thanks to Photoshop! But if you have one, bring it! It is much easier to put together a sequence that is perfectly lined up straight out of the camera than aligning all the frames in post and cutting out pieces of the image. Although if you don’t have one, don’t worry about it, photoshop has a solution for you.
With all these tips in mind you should be able to get a good set of images that we are going to put together in the next tutorial. Have fun shootin’!


